How to Install WordPress Manually?
Step 1: Download and Extract
Step 2: Create the Database and a User
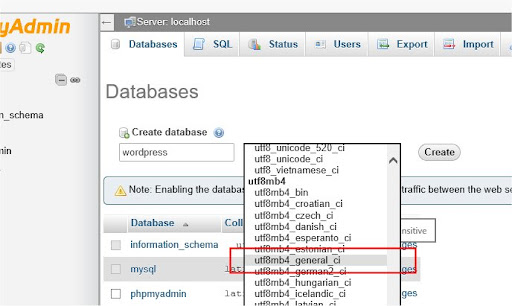
1.Choose a name for your WordPress database: ‘wordpress‘ or ‘blog‘ are good, but most hosting services (especially shared hosting) will require a name beginning with your username and an underscore, so, even if you work on your own computer, we advise that you check your hosting service requirements so that you can follow them on your own server and be able to transfer your database without modification.
2. Enter the chosen database name in the Create database field and choose the best collation for your language and encoding. In most cases it’s better to choose in the “utf8_” series and, if you don’t find your language, to choose
Click the phpMyAdmin icon in the upper left to return to the main page, then click the Users tab. If a user relating to WordPress does not already exist in the list of users, create one:
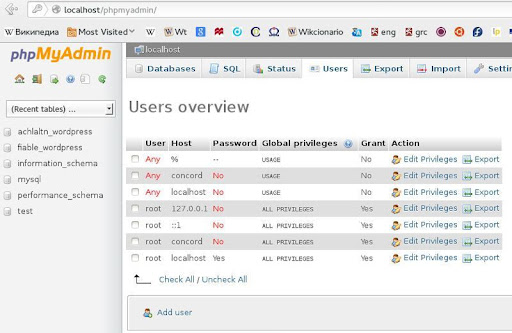
Click Add user.
- Choose a username for WordPress (‘wordpress‘ is good) and enter it in the User name field. (Be sure Use text field: is selected from the dropdown.)
- Choose a secure password (ideally containing a combination of upper- and lower-case letters, numbers, and symbols), and enter it in the Password field. (Be sure Use text field: is selected from the dropdown.) Re-enter the password in the Re-typefield.
- Write down the username and password you chose.
- Leave all options under Global privileges at their defaults.
- Click Go.
- # Return to the Users screen and click the Edit privileges icon on the user you’ve just created for WordPress.
- # In the Database-specific privileges section, select the database you’ve just created for WordPress under the Add privileges to the following database dropdown, and click Go.
- # The page will refresh with privileges for that database. Click Check All to select all privileges, and click Go.
# On the resulting page, make note of the host name listed after Server: at the top of the page. (This will usually be localhost.)

Step 3: Set up wp-config.php
You can either create and edit the wp-config.php file yourself, or you can skip this step and let WordPress try to do this itself when you run the installation script (step 5). (you’ll still need to tell WordPress your database information).
Step 4: Upload the files
Now you will need to decide where on your domain you’d like your WordPress-powered site to appear:
- In the root directory of your website. (For example, http://example.com/)
In a subdirectory of your website. (For example, http://example.com/blog/)
Step 5: Run the Install Script
Point a web browser to start the installation script.
- If you placed the WordPress files in the root directory, you should visit: http://example.com/wp-admin/install.php
- If you placed the WordPress files in a subdirectory called blog, for example, you should visit: http://example.com/blog/wp-admin/install.php
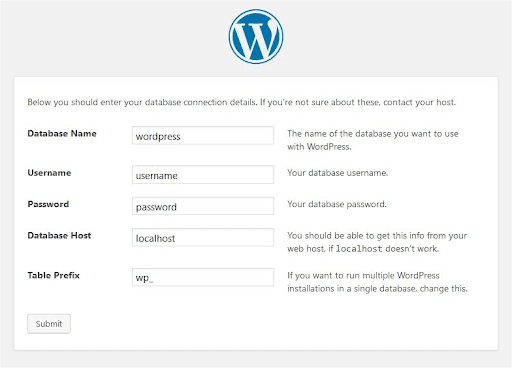
Setup configuration file
If WordPress can’t find the wp-config.php file, it will tell you and offer to try to create and edit the file itself. (You can also do this directly by loading wp-admin/setup-config.php in your web browser.) WordPress will ask you the database details and write them to a new wp-config.php file. If this works, you can go ahead with the installation.
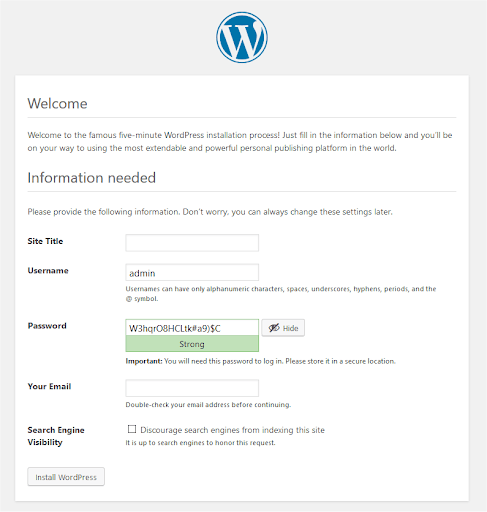
Finishing installation