
Step-by-Step Guide to Migrate Your WordPress Site to Joydigital Hosting
Step 1: Upload wordpress file in Public_html
Firstly, upload your wordpress files into the public html folder in zip format.after that unzip the folder .
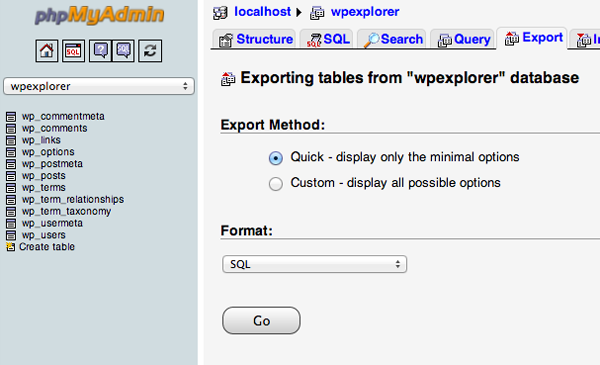
Exporting your database is a simple process that only requires a few steps to complete. Login to the cPanel account of your web server and open the phpMyAdmin application. Select the database that contains your WordPress installation from the list on the left hand sidebar and once selected click on the Export tab on the navigation menu.
Once the database export and the FTP transfer of your files have both completed, you are ready to move onto the next stage.
Step 3: Create the WordPress Database on Joydigital hosting Server
The steps to create a database are quite simple:
1.Open MySQL Database and create a new database with an appropriate name for your website.
2.Create a new MySQL user (with a secure password).
Add this user account to the new database and grant it All Privileges.
3.Write down the database name, the new MySQL username and its password. You will need them soon.
Step 4: Edit the wp-config.php File
Browse to the folder on your local computer where you downloaded your website files to. In that folder there is a file called wp-config.php that controls the access between WordPress and your database. Make a copy of this file and store it in another folder on your local computer. This is necessary for restoring the changes we are about to make should something go wrong later. Open the original version of the file with your favorite text editor and make the following three changes:1. Change the Database Name
Locate the following line: define(‘DB_NAME’, ‘db_name’);The db_name portion of this line will currently be set to the MySQL database name of your old web host. This must be changed to the name of the new database you have just created.
2. Change the Database Username Below this you will find the line: define(‘DB_USER’, ‘db_user’);
As with the others the db_pass section of this line must be changed to the new secure password you created for your MySQL user.
Save wp-config.php and close the file.
Step 5: Import Your WordPress Database

if you are moving to a new/different domain then you should read over this step, if not, then you can skip this because you don’t have to update your site to point to a different domain. Changing Site URL: By doing a search and replace for the old domain and replacing with the new domain you’ll also be altering the site_url and home url values in the database (Changing the Site URL) which will ensure that when you try to log into your site on the new domain it doesn’t try and redirect you over to the old domain.


